

Members table
Find the right members by filtering on activity, roles or linked accounts, then tag them, add or remove roles in bulk and export the list.
CRM → Members lists every member CEEJAY knows about, one row each. Use it to find the right members for a beta test or an event, build groups with filters, tag members, add or remove roles for many members at once, and open a member's profile. Right-click a member for the actions you use most.
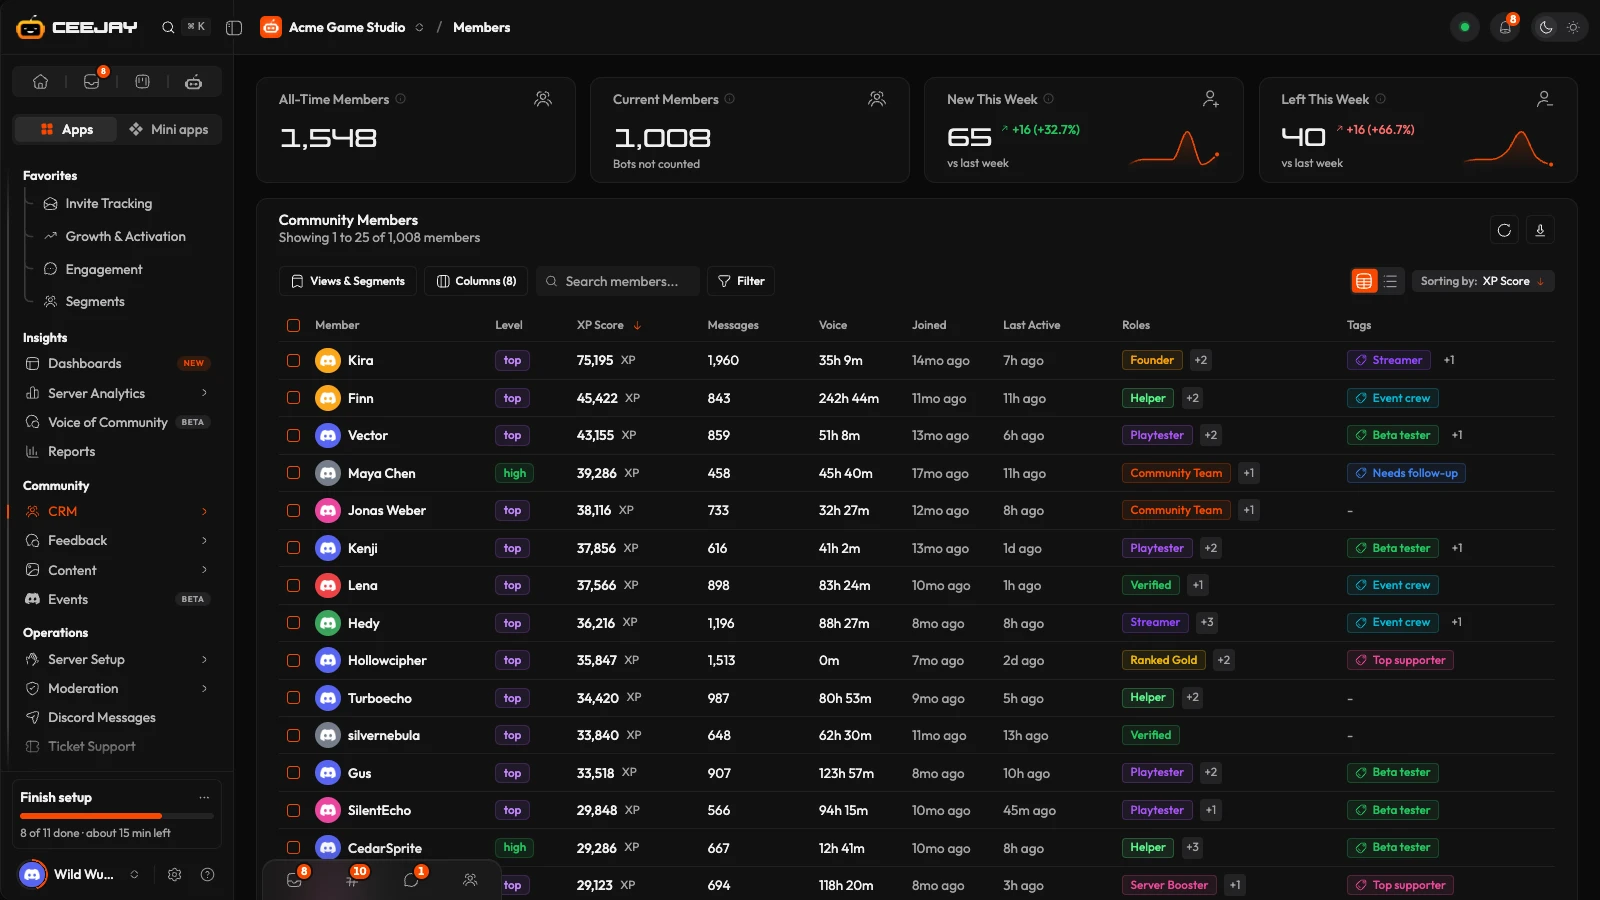
What you see
- Four stat cards.
- Community Members: the list.
- Filter, beside the search box, and under it one pill for each filter that is on, with Clear all.
The list only includes members who are still in the server. Tick Left Server or Banned on the Show line of Filter to include them.
The stat cards
These do not change with the filters.
| Card | What it counts |
|---|---|
| All-Time Members | Everyone ever tracked here, including members who have since left. |
| Current Members | Members still in the server. Its (i) says how many have left. |
| New This Week | Joins in the last 7 days. Someone who left and came back counts again. Compared with last week. |
| Left This Week | Leaves in the last 7 days. Compared with last week; fewer is better. |
Table and list
The two icons at the top right switch between Table view and List view. The table is the default; phones open on the list.
- The table has one column for each piece of member data.
- The list is one card for each member: avatar, name, messages, XP, when they were last active and their Level. An Influencer tag marks members whose Influence is above 70%. The list has no checkboxes, Columns or sorting.
In the table, press a row to open the member's profile in a side panel. Checkboxes, links and buttons in a row act on their own and do not open the profile. A card in the list opens the profile on a phone only.
Columns
Press Columns (it shows how many are on) to choose what the table shows. Your choice and its order are remembered in this browser. Press a heading to sort by it, and again to reverse it. Sorting by names the current sort; the default is XP Score, highest first.
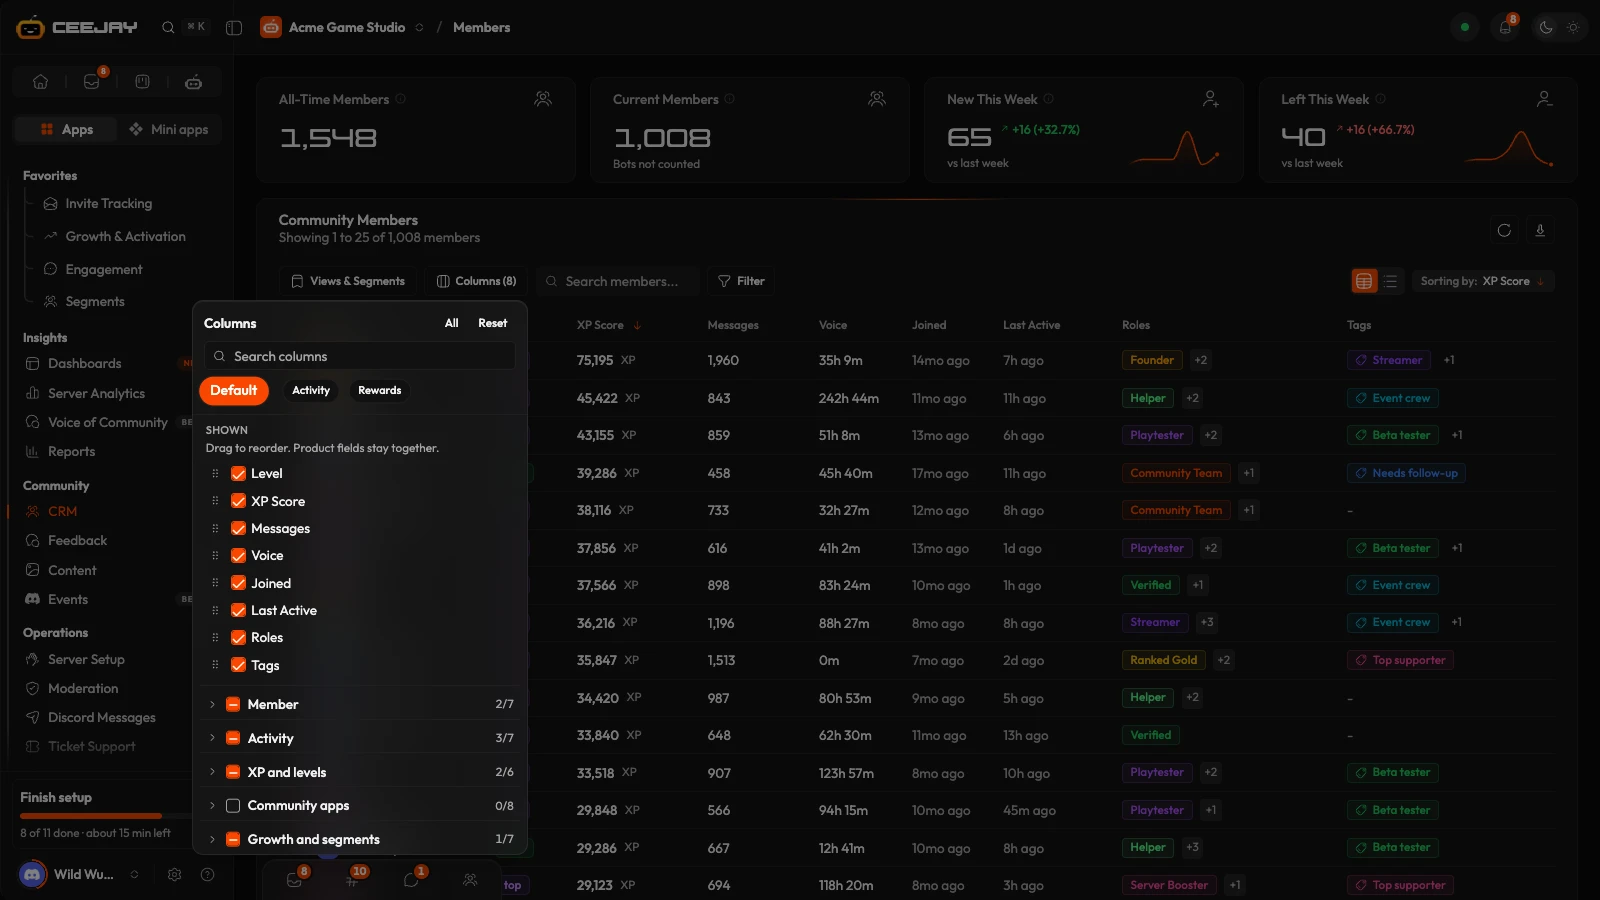
The menu has four parts:
- Search columns finds a column by name, and opens the groups that hold a match.
- Default, Activity and Rewards are presets that replace every column at once. All shows every column and Reset goes back to the defaults. Each of these offers Undo straight away, so a preset never costs you the columns you picked one by one.
- Shown lists the columns in the order the table draws them. Drag a column to move it. Untick it to hide it.
- Below it, every column sits in a group, which you open and fold: Member, Activity, XP and levels, Community apps, Growth and segments, Steam and keys, Your fields, and one group for each connected product. A tick box on a group heading shows or hides all of its columns. A column you tick is added to Shown.
On by default: Level, XP Score, Messages, Voice, Joined, Last Active, Roles and Tags. The Member column is always there. The others are Username, Email, Activity Trend, Message XP, Voice XP, Reactions Given, Reaction XP, UGC Items, UGC XP, Tickets, Giveaways, Suggestions, Polls, Forms, Events, Influence, Sentiment, Type, Invited By, Days Inactive, Status, Identities, Segment, Segment Trend, Retention, Activity Score and, where it is switched on, Campaigns. Each member field you create adds a column too, under Your fields.
Steam and connected products
If your game is saved in Connected Apps, Steam and keys adds the columns Owns the game, Playtime and Last played, filled in from the daily check on each member's linked Steam account. Owners and admins also get Keys received: the Steam keys and gift codes each member received, so you can check or revoke one quickly. A team member never sees that column.
The fields a connected product sends (Ultimate Bots, or a game of yours) sit together as one block. In the table they are grouped under the product's name. In the menu the block moves as one, and its tick box adds or removes only that product's columns. A member with nothing from the product reads "Not linked" once across the block.
| Column | What it shows |
|---|---|
| Level | How the member ranks against other active members: "top", "high", "medium" or "low". A new member who has not been ranked yet shows "inactive". It is separate from segments, and it is not the XP level (Lv) on the profile. |
| XP Score | The member's XP. See XP. |
| Messages, Voice | Lifetime totals. |
| Activity Trend | How the member's messages in the last 14 days compare with the 14 days before, in percent. |
| Influence | A percentage calculated when you re-sync, from the member's messages, voice time, reactions received and UGC items. |
| Sentiment | The average sentiment of the member's messages, from 0% to 100%. Messages without a label count as 50%. |
| Status | In Server, Left or Banned. |
| Identities | The linked accounts the member has. See Account Linking. |
| Owns the game, Playtime, Last played | Whether the member's Steam owns your game, how long they have played and when. |
| Segment, Segment Trend | The system segment the member is in now, and whether they moved up or down since the last one. |
| Retention | How long the member has been in the server. |
When the numbers update
The list itself is live: joins, leaves and role changes update automatically. Level, Activity Trend, Influence and Sentiment are recalculated when you press the re-sync button at the top right of the card (its tooltip reads "Re-sync all members from Discord"). It rebuilds profiles from the activity CEEJAY has collected, shows its progress, and can take a few minutes on a large server.
Search and filter
Search members... finds a member by display name or username. Everything else is a filter.
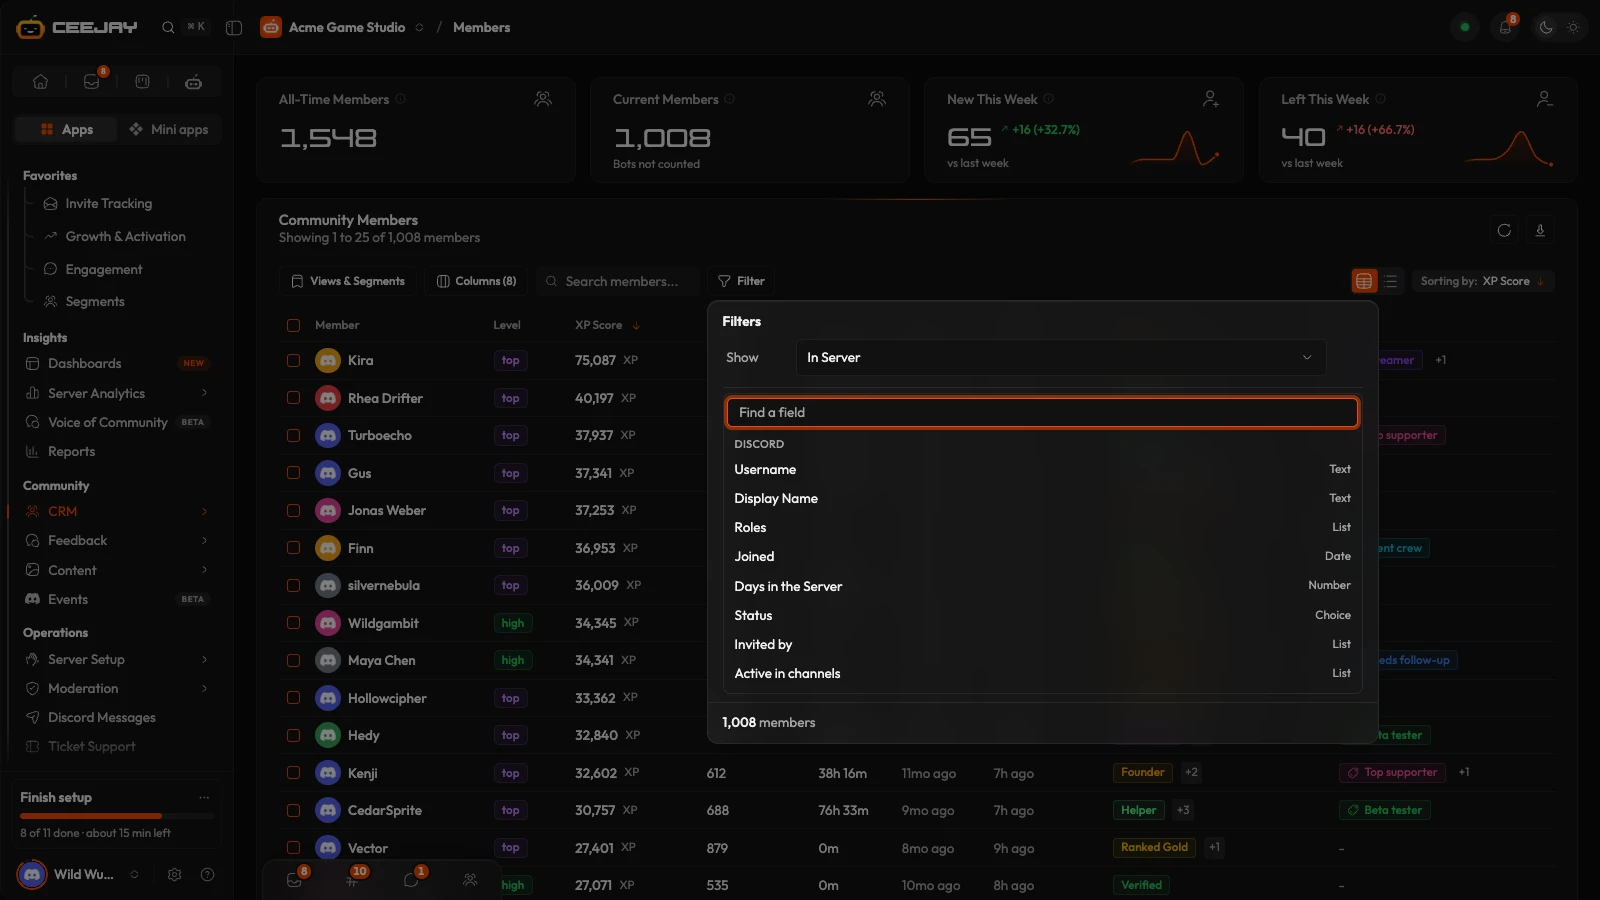
Press Filter. Every filter is a line: the field, how it compares and the value, and the list changes as you set them. Press Add filter and pick a field. The groups are:
- Discord: Username, Display Name, Roles, Joined, Days in the Server, Status, Invited by and Active in channels.
- Activity: Total Messages, Voice Minutes, Level, Last active, Days Inactive, Reactions Given and UGC Items.
- XP: XP Score and the four XP columns.
- Apps: Tickets Opened, Giveaway Entries, Suggestions Posted, Polls Answered, Forms Submitted, Events Attended and, where it is switched on, App activity.
- CRM: Tags, Email and Linked account.
- Member fields, one group for each connected product, and More conditions, such as Roles: has none of and Last active: before, after or days ago.
With two or more filters, the second line chooses and (a member matches every filter) or or (any one of them). The foot of Filter shows how many members match and has Save View, Save Segment and Clear all.
Each filter also shows as a pill under the search box. Press a pill to open Filter at its line, and its cross to remove it.
To filter one column, press the filter icon on its heading: that column's filter opens under it, and each tick filters the list. Edit in Filters opens the same filter in Filter.
A few filters have their own choices:
- Level offers Top Contributors, High Activity, Medium Activity, Low Activity and Inactive.
- Status offers In Server, Left Server and Banned.
- Joined takes presets from Last 7 days to Last year, or a custom date range. Last active takes presets from Past 1 hr to Past 3 months, or a custom range.
- Roles and Tags take several values, with Has any of, Has all of or Has none of.
- Linked account takes a state, such as Follows your account or Needs reconnecting, on one platform or on any platform.
Save a view or a segment
Saving is offered once a filter is on.
Build the filters you want, then press Save View or Save Segment at the foot of Filter. One dialog holds both: the switch at its top changes between them.
For a view, type a View Name and press Save View. A view needs at least one filter. It is shared with your team: everyone can use it, and only you can delete it. Open it later from Views & Segments, where the page shows Viewing and its name.
For a segment, give it a Segment Name, a Description, a Color and an Icon, decide on Auto-update membership, and press Create Segment. See Segments.
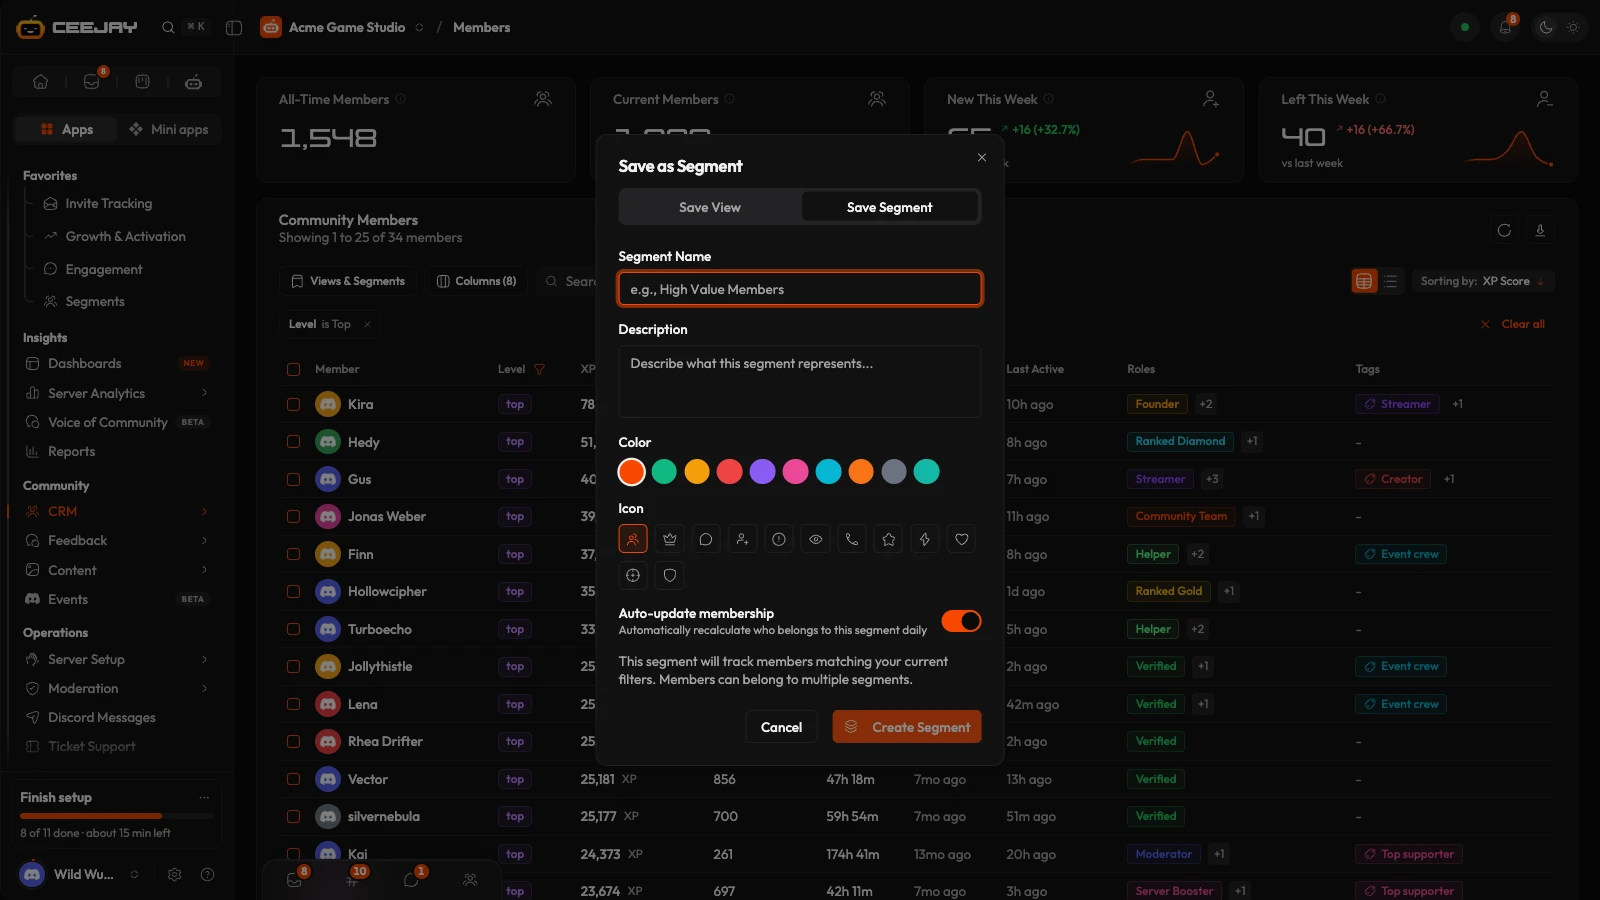
A segment can hold Level, Roles, Tags, Joined, Last active, Status, Linked account, App activity and member fields, and a member must match every one. It cannot hold the number and text rules (such as Total Messages or XP Score), anything under More conditions, Active in channels, Invited by, a search or Match any. The dialog lists the rules that are not supported (they show as Advanced rules), and the button stays disabled until you remove them.
Tags, roles and email
- Tags: point at the cell and press +. Search for a tag, or type a new name and press Enter to create it. The pencil edits a tag and the bin deletes it, which takes it off every member.
- Roles: the cell shows the highest role and a +N button for the rest. Point at the cell and press + to add or remove roles. CEEJAY can only assign roles that sit below its own role in Discord.
- Email: press the cell, type an email address and press Enter. An email address on its own is not consent: see Email.
Right-click a member
Right-click a row, or a member's card in the list, and the menu opens where your pointer is:
- Open profile and Open full profile.
- Add/Remove Roles and Add/Remove Tags for that member.
- Select or Unselect, Copy Discord ID and Copy username.
Right-click a member who is part of a selection and the menu acts on the whole selection instead. It reads "N members selected" and lists the same Actions as the bar at the bottom, then Clear selection. Shift-right-click, or a text box, link or selected text, keeps the browser's own menu.
Work on many members
Tick members with the checkboxes. The tick in the heading selects the page. A bar appears at the bottom with the count, Actions and Clear. Once the whole page is ticked and more members match your filters, the bar also offers Select all N matching, up to 5,000 members. Above that it reads Select the first 5,000 of N matching.
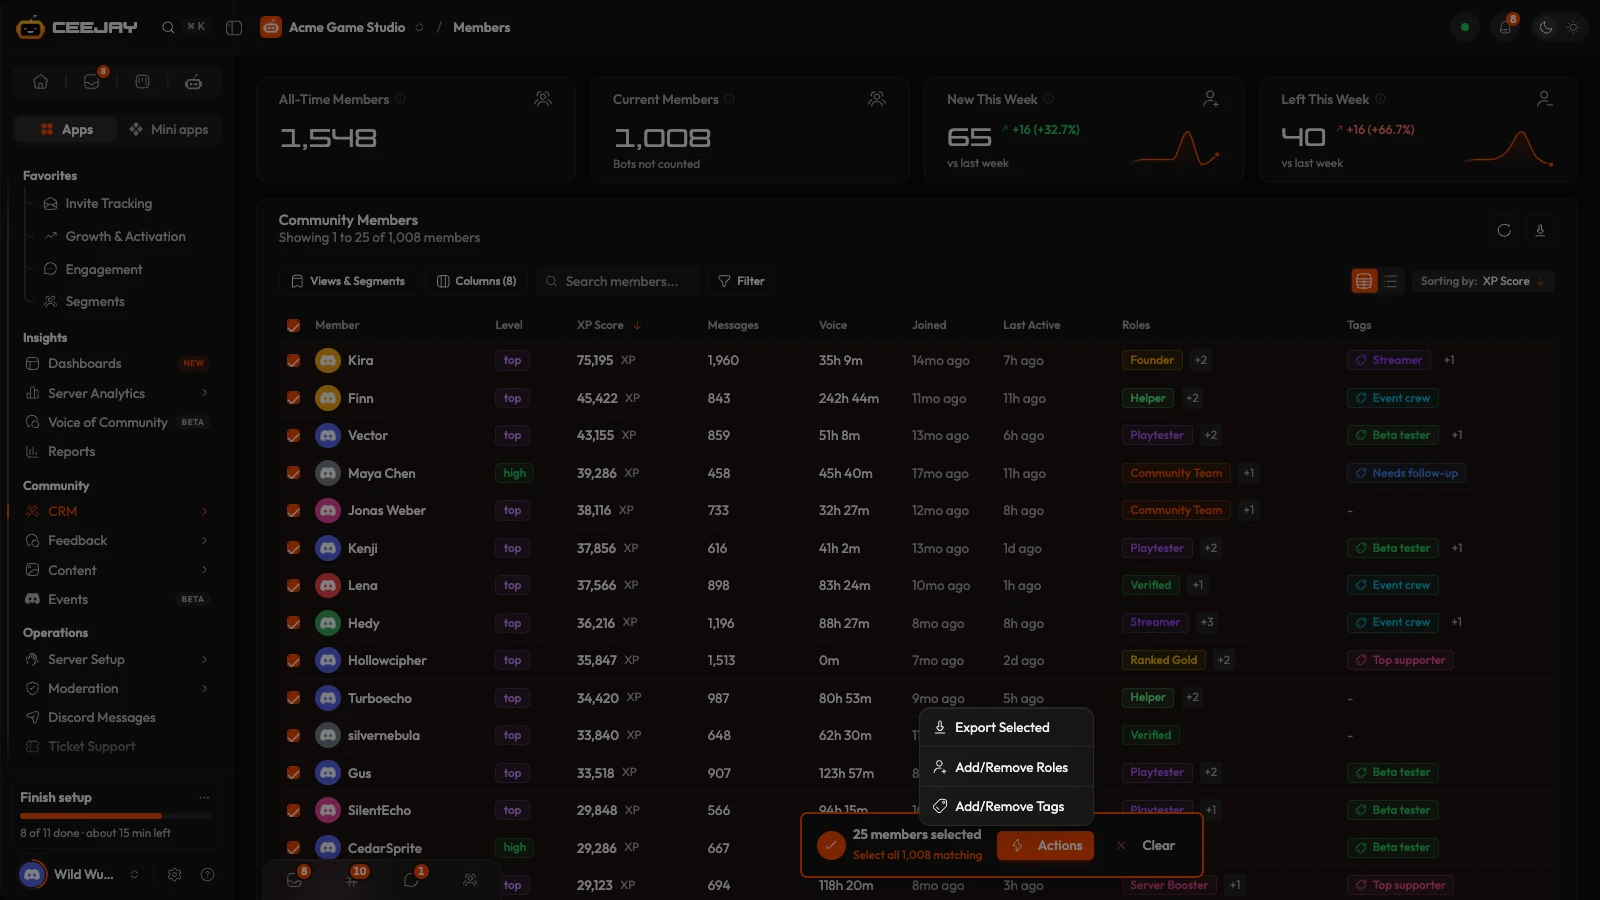
- Add/Remove Roles opens a dialog with Add Roles and Remove Roles tabs. Pick roles and press Add Roles, Remove Roles or Apply Changes. It runs as a background job with a progress bar, and a large batch can take several minutes.
- Add/Remove Tags opens a dialog with Add Tags and Remove Tags tabs. Type a new name and press Enter to create a tag. The tags are applied at once.
- Export Selected downloads the selected members as a CSV file.
Export
The download icon at the top right of the card saves the members on the current page (25, 50 or 100 rows) as a CSV file, with a column for each of your member fields that is not Sensitive or archived. Export Selected saves a selection that spans pages. Both are hidden for a team member whose access leaves out Allow CSV/data exports, set in Settings → General → Team Management.

